Nusuk Hajj is the one-stop-shop platform overseen by the Ministry of Hajj and Umrah, offering pilgrims from serviced countries a variety of Hajj packages, provided by authorised service providers, to ensure a seamless Hajj experience.
This manual is here to help you use the Nusuk Hajj platform confidently, so you understand every part of it clearly, get the most out of what it offers, and have a great experience with its services.
Registration
On the Nusuk Hajj home page you will find two buttons: "Start Registration" and "Registration Assistance".

Registration Assistance
Registration Assistance leads you to the FAQ page, where you can get help and support on the platform, registration, family members, packages, and booking, and learn more about Nusuk Hajj and its target audience. You can also get support through these contact channels:
Live chat
Press "Start Chat" to open a live chat window.
Support email
Press "Email Us" to open a new ticket. Fill in your first and last name, email, contact mobile number, and what you need assistance with, then press "Send Ticket".
Support centers
Press "Book an Appointment" and fill in the location, your full name, contact number, email address, and the date and time to get an appointment at the nearest center, then press "Book Appointment".
Social media
Press any of the social media platforms to reach Nusuk Hajj there.
Call center
Dial the contact number shown in the box.
Start Registration
- Select your country of residence.
- Tick the box to confirm your country of residence.
- Insert your email address.
- Read the Terms and Conditions and tick the box to confirm you have read and agree to them.
- Press "Create Account".
- On the verification page, enter the OTP verification code you received by email.
- After entering the OTP successfully, you are taken to the create password page. Fill in a new password and confirm it, following the password policy below.
- Press "Create Account", then "OK" to be taken to the login page.
Password policy
- A minimum of 8 characters.
- At least one lowercase letter.
- At least one uppercase letter.
- At least one number.
- At least one special character (@#$%^&).
- The confirmed password matches the new password.
Logging In and Resetting Your Password
Login
- Enter the email address you registered with.
- Enter your password.
- Press "Login", then enter the verification code sent to your email.
Forgot Password
If you registered with your email and can't access your account, you can reset your password:
- From the home page, go to "Login".
- Press "Forget Password".
- Enter your registered email address, agree to the terms, and press "Send Reset Link".
- A password reset link is sent to your email. Open the link.
- On the page that opens, enter your new password and confirm it, then press "Reset Password".
- Your password is reset and you are taken to the login page, where you can log in with your new password.
Uploading Your Documents
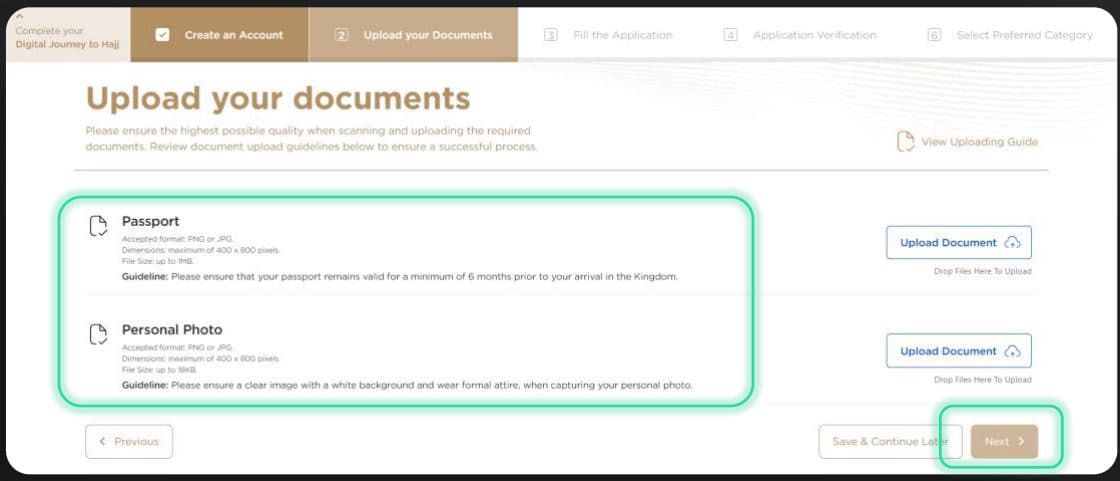
After you log in, you are taken to the uploading guide, which helps you with the files you need to upload: your passport, personal photo, and proof of residence. Pressing "Start Uploading" takes you to the document upload page. The acceptable file specifications are listed under the required documents.
- Upload your passport and personal photo, then press "Next". You can skip this for now by pressing "Save & Continue Later".
- You are taken to a summary page, where you can view and edit your personal information, personal photo, and uploaded documents.
- Confirm that you agree to all the data above and that it is accurate, then submit and confirm your submission to move to the next step.
- You are taken back to the upload page to upload your proof of residence.
- The summary page appears again so you can review all the data and documents you have added. Then press "Next".
Filling In the Application
- Contact details: your mobile contact number, mobile number, social status, emergency contact full name, and so on.
- Occupational details: your occupation, current employer, previous work, name of sector, and so on.
- Arrival details: your expected entry date, expected days in the Kingdom, and so on. Then press "Next".
- Background details: answer the questions in both parts, then press "Next".
- Your preferences: accessibility requirements, health conditions, and allergies.
- Summary: review the details you have added, tick the confirmation boxes, and press "Submit". You can also add a family member here.
After submitting your application, you can browse the site.
My Profile
In My Profile you can view your application status, check or edit your personal information, and delete your account. You can also check, add, or edit your family members.
Under verification
Your application is being reviewed.
Verified
Your application has been approved.
Rejected
You receive an email with the reason for the rejection. You can go to your account and update your application, after which the status returns to "Under verification" until you receive a reply.
Managing Family Members
Adding a new family member opens a pop-up window.
- Enter the family member's email.
- Select your family relationship.
- Select the family member's country of residence and confirm it.
- Press "Add a family member". The member receives an OTP code by email to be added to the system.
- You then go through the same document upload and application steps for the added family member.
- Once added, family members appear in the Family Members tab, where you can add another member, transfer authority, edit, delink, or delete a member.
Good to know
- You can add up to 7 family members under your account.
- A member who registered with their own email can only view the profile; the only action they can take is to delink from your account.
Selecting a Preferred Category
After your application is verified, you can view packages and select your preferred category by pressing "Mark as Preferred". The available categories are:
- Luxury
- Premium
- Standard
Your eWallet
After the audit process and verification approval, you are taken to the activate eWallet page, or you can activate it from your dashboard.
Activating Your eWallet
- After choosing your preferred package, click to activate the eWallet.
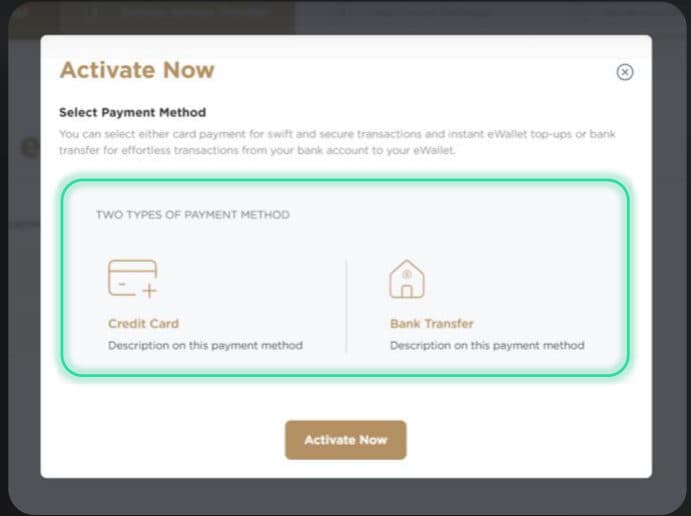
- A pop-up asks you to choose a payment method: credit card or bank transfer.
- You are taken to the top-up page. With a credit card, enter the amount, then click "Next" to add your card details. With a bank transfer, a page appears where you add your personal bank details.
- After you click "Next", the data is saved to your profile and the Nusuk bank details appear. The IBAN shown is your Nusuk user IBAN.
Viewing Your eWallet
You can check your eWallet from the dashboard (in the eWallet Value box, click "View eWallet") or from My Profile (select "My Wallet" on the left). My Wallet shows:
Transaction history
The eWallet top-ups and refunds made on your account.
Bank account details
Your account's bank details, which you can update by pressing "Change".
Top-up
Takes you to the top-up page.
Withdrawal
Takes you to the refund page.
Export and Print
Export your transactions as a PDF, or print them.
Requesting a Refund
- Go to My Profile.
- Open My Wallet.
- Press "Withdrawal". A disclaimer appears: read it carefully and approve it.
- Once you approve, the whole amount in your wallet is refunded.
Refunds go back the same way the eWallet was charged. For example, if you added 100 by credit card and 50 by bank transfer, 100 returns to the card you used and 50 to the bank account you added.
Become a Guide
After your application is verified, you will notice an additional option to become a guide (mentor).
- Go to the home page.
- Click "Become a Guide".
- Submit your application.
- Once you complete registration and fill in the required information, your application is submitted and you will be contacted with an approval or rejection.
- If you are accepted as a guide, your file is presented to service providers.
- You can see the contracts sent to you through alerts.
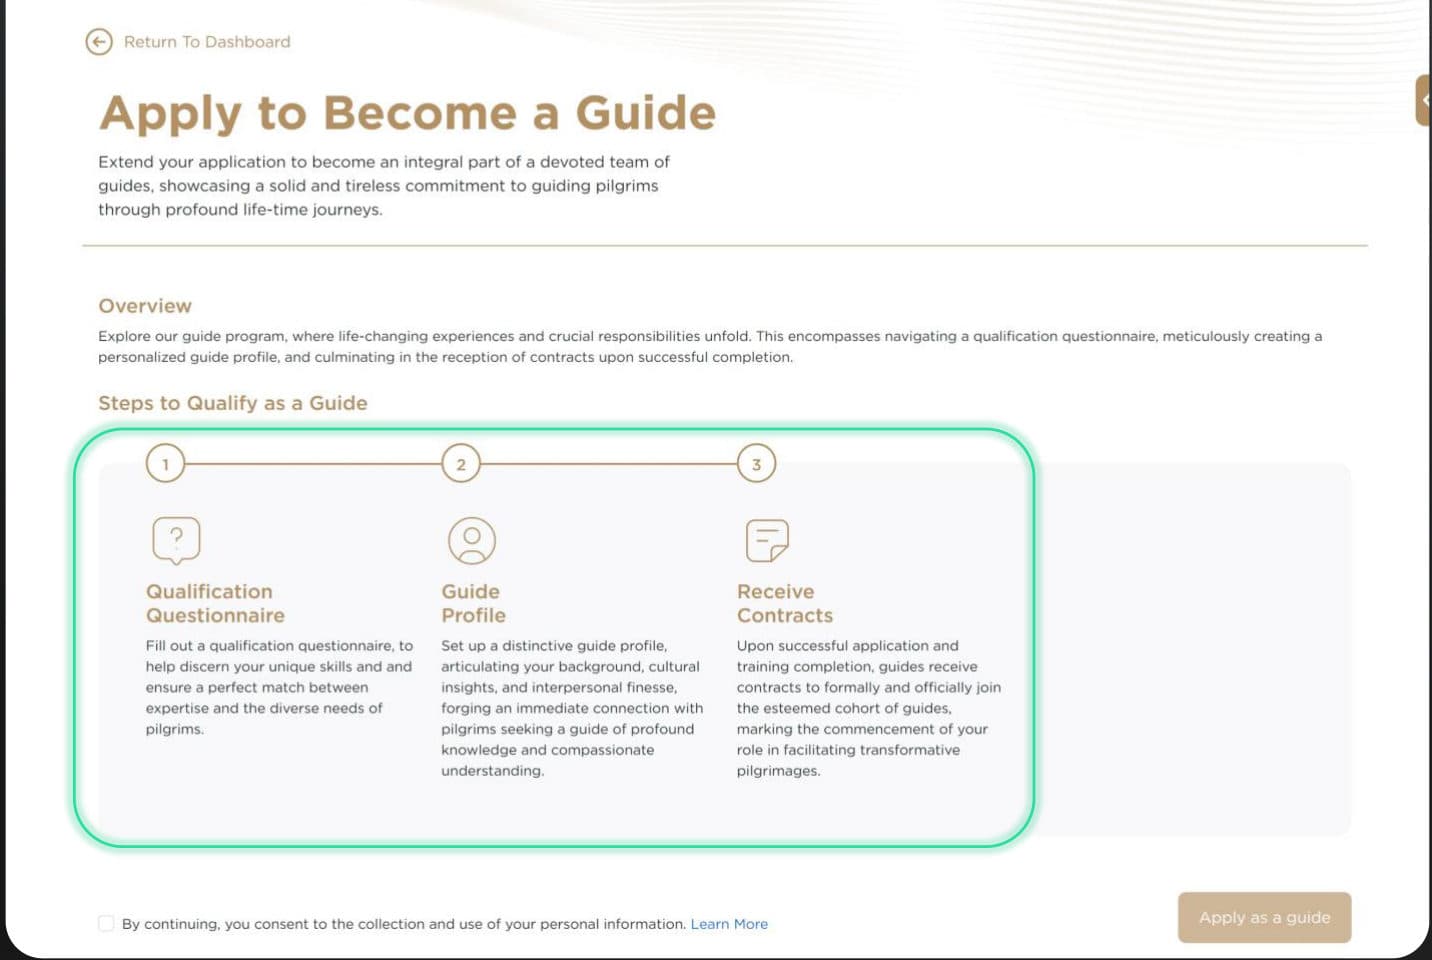
Qualification questionnaire
Fill out a questionnaire that helps match your skills and expertise to the needs of pilgrims.
Guide profile
Set up a guide profile describing your background, cultural insight, and interpersonal skills, so pilgrims can connect with you.
Receive contracts
After a successful application and training, guides receive contracts to formally join the team of guides.
Conditions
- You can't register as a guide if a family member has been added to your account.
- Your eWallet must not have been charged.
- Your account must have received final approval from the audit at least once.
- You can register as a guide only once.
Booking a Package
- After selecting your preferred package and charging your eWallet, you are taken to the "Book your Package" page to book according to your preference.
- Browse the packages and their details. You can filter packages to view specific criteria.
- When you find the package you want, press "View Details". The package details include package images, an overview, residency (where you can view the hotel services and watch a camp tour), Mashair camps, transportation, and package services (included, not included, and available at an additional fee).
- Read the cancellation policy, then press "Configure".
- Set up your package details: choose your Makkah hotel beds, your Madinah hotel beds, any additional services you need, and your flight.
- Proceed to payment. You will receive a confirmation, or the reason if the payment is not confirmed.
Good to know
- You can buy a package only if the main pilgrim and all their family members are verified.
- You must read the cancellation policy before proceeding to the next step.
- Your eWallet must be charged with an amount greater than the package price; otherwise you can't complete the purchase.
- When you buy a package, the system can take up to 5 minutes to check the package and take the payment.
Communication Channels
| Channel | Contact |
|---|---|
| Website live chat | hajj.nusuk.sa |
| Support email | Support@hajj.nusuk.sa |
| Support centers | Book an appointment |
| Social media | Hajj_Nusuk |
| Call center | +966 9200 31201 |